January 27,2021
For the longest time, we had this beautiful piece of cedar in our wood stock. Cedar wood typically has interesting features, with knots and contrasting streaks of pink and off-white grain. But this one was so visually striking, we had to make it into something special!

DEALING WITH KNOTTY WOOD
So, what's a good way to show off the qualities of a piece like this? Knots create interesting grain variations and look really cool, but they can ruin your day if they get in the way of cuts, have unstable voids, or even decide to break free while you work the piece.

Lucky for us, this cedar was particularly nice because of its heavy but tight knotting. Knots look cool from the surface of the board, but there is even more character through the cross section. Since these knots were small and well formed, they were stable and not likely to fall out, even when disturbed with cuts.
GETTING STARTED
Our goal was to reveal as much of the detail of this piece as possible, by cutting it into shapes which exposed what was going on inside the board as well as on the outside.
After spending some time to create a 3D design that promised to reveal the beauty of our workpiece, we started the project by cutting some very subtle curves into the top and bottom of the cedar plank.

LAYERED DESIGN
With roughly a 3/4" thickness, our cedar piece wasn't quite tall enough the design we had in mind. In order to increase the overall height and add some contrast to the finished piece, we took a 1/4" thick piece of white maple and glued it to the top arch of the curved cedar.

OUTSIDE PROFILING
With our glued-up workpiece ready to go, it went back into our CNC router for more cutting.

CNC PROFILING THE WORKPIECE
This time in the CNC router, we used our endmill to run around the final profile of our design, stepping down incrementally until we cut through the entire piece. With this technique we can cut precise curves and straight lines that would have been difficult or time-consuming to profile by hand.

PROFILING COMPLETE
Another benefit of cutting our profile (roughly 5.5" wide) out of the middle of our 6" wide workpiece is that we can get rid of the naturally sloppy edges of our glueup. What's left after profiling is a cleanly cut shape with a beautifully tight seam between the cedar and maple layers.

MANCALA BOARD DESIGN
A standard Mancala board needs 14 pockets; two rows of 6 identical small pockets, with larger pockets on either end.
Your average, inexpensively mass-produced Mancala board features some shallow round holes in straight lines, but we wanted to do something a little different. With slightly squared pocket shapes and arching rows that followed the curve of our board, we add a little sophistication and elegance to the design.
Also, are we the only people who get frustrated when the board's pockets are too small? Seriously, whoever designs most of the boards I've seen must not have actually played with them and tried to drop 8 pebbles in a single spot. Anyway, let's get on with it. We designed our pockets nice and deep to avoid this problem.

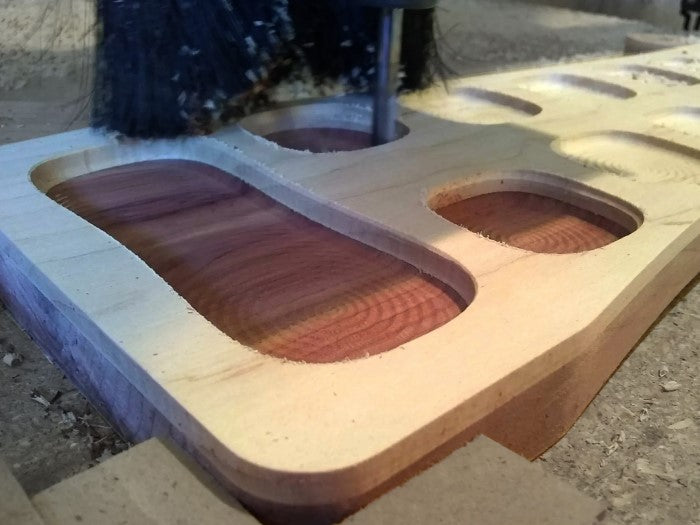
POCKETING
With the outside edges cut to shape, our next step was to switch to a ball endmill for pocketing. Pocket cutting for this step was done in two phases:
- Rough cutting to remove the bulk of the material (shown below)
- Fine cutting to skim out the last remaining material and leave a smooth finish

Watching a CNC mill while it cuts can feel like watching a sculpture materializing before your very eyes! Here we're getting some peeks of that really cool contrast between the pink cedar and white maple bordering the pockets.
Pocket rough and finish cutting complete. Next step is sanding.

Most of the milled edges and surfaces have a nice finish, so we began with a 120 grit sandpaper and worked our way upward to get the right finish.

A quick stop to burn in our logo with the branding iron. The iron darkens the wood but also sinks down slightly so a little sanding after the burn crisps up the edges nicely.

FINISHING
The final step for this project was to apply a generous treatment of danish oil to the whole piece. The oil deepens the colors and makes a good water-resistant treatment. Because the pore structure of the wood isn't sealed up by oiling the way a polyurethane or lacquer does, its lustre can be easily renewed later with a fresh application.
CONCLUSION
After oiling, our Mancala board was complete! We hope you enjoy these pictures of the finished project.


If you'd like to own one of our mancala boards, you can check them out in the games section of our store!